Everything you needed to know about Fabric Nap
After you’ve been sewing a while, you might be tempted to explore different types of fabrics. One thing to consider is the direction or nap of a fabric. Here’s everything you need to know about fabric nap.
Disclosure: This post contains affiliate links. If you purchase after clicking these links, Threadistry may receive a small commission, at no cost to you.
What is nap in sewing?
The dictionary definition of nap is:
the surface of a piece of cloth such as velvet, consisting of short threads that have been brushed in one direction
Cambridge English Dictionary, “nap”, accessed 30th March 2021, https://dictionary.cambridge.org/dictionary/english/nap
The pile or texture is created in the weaving process of the fabric. Nap can refer to any fabric that has a directional appearance or texture – that is, the fabric looks different depending on which way it is held up or rubbed.
What types of fabric have nap?
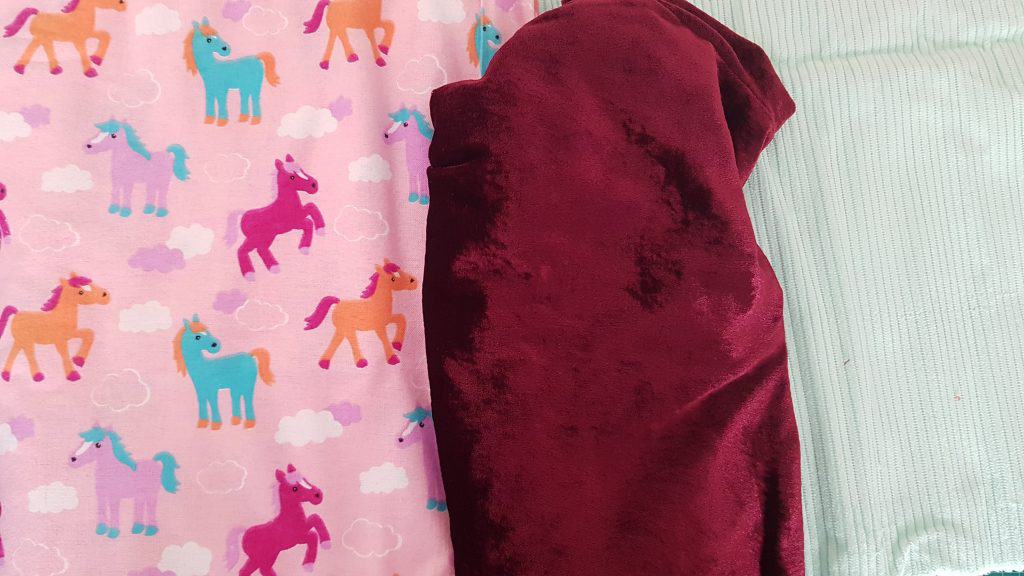
Lots of different fabrics have nap, including:
- Velvet
- velour
- velveteen
- corduroy
- faux fur,
- terry,
- minky,
- fleece,
- flannel,
- moleskin, and
- suede
If you’re not sure if your fabric has a nap, run your finger up and down over the fabric. If the fibres smooth down in one direction and feel rough and spiky in the other, your fabric has nap. The smooth direction is referred to as “with the nap” and the rough direction as “against the nap”.
Satin and other shiny but smooth fabrics can also have a nap. Check your fabrics in bright light to see if you can see a difference. Fabric with a one-directional design/print can also be treated as having nap.
Why is fabric nap important in sewing?
The color and texture of a napped fabric can appear different depending on the direction of the nap. It is often lighter and shiny with the nap, and matte and darker against the nap. If you cut your pattern pieces in different directions, it can look like two different fabrics were used.
The direction of the fabric nap can also impact the feel and comfort of a garment. As people generally smooth their clothes from top to bottom, that is the typical direction to go with the nap.
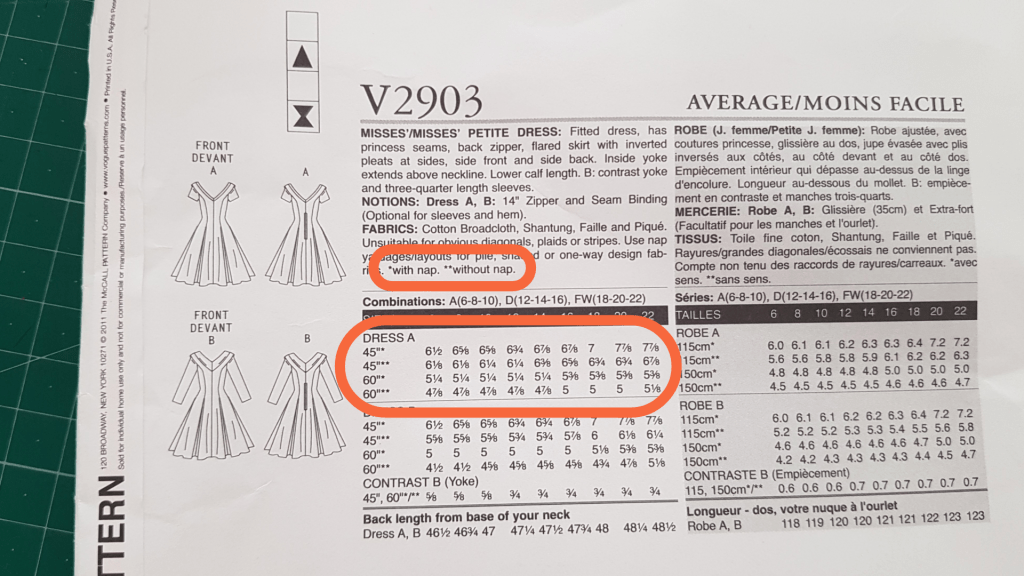
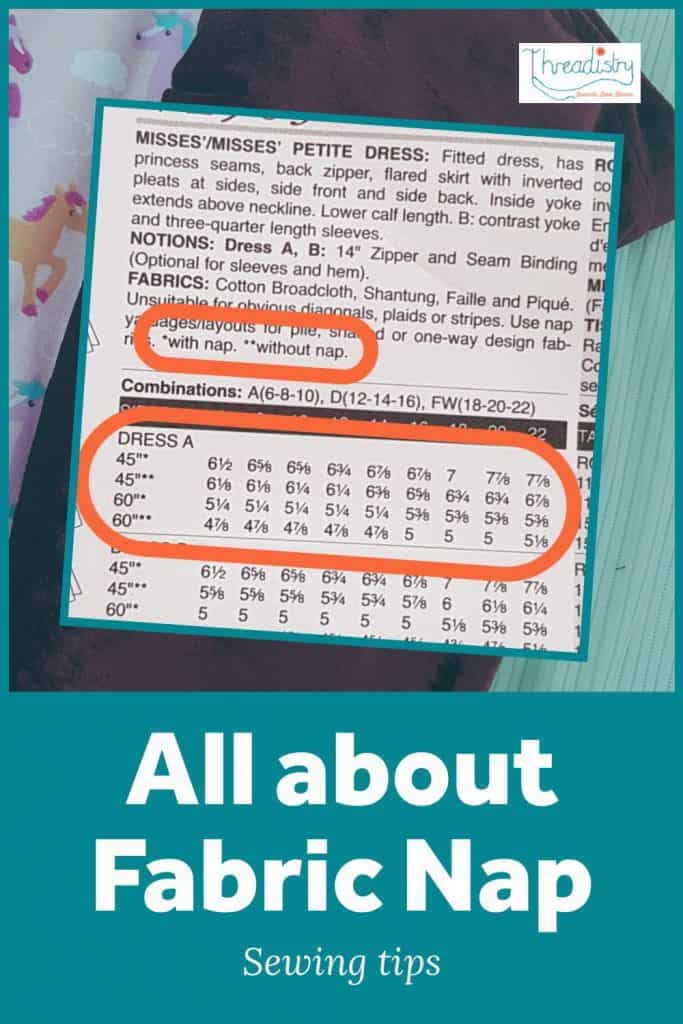
You may need more fabric for a project if it has nap. There is no set amount of extra fabric – it depends on how the pattern pieces fit together and the width of your fabric. Patterns from the Big 4 paper pattern companies often list the fabric requirements both with and without nap on the pattern envelope.
How to cut fabric with nap?
Cut all pattern pieces in the same direction (unless you are using the nap as a feature). Check if your pattern includes a “with nap” cutting layout to work out the best way to position your pattern pieces.
For fabrics that have a rough and a smooth direction, typically you want the fabric to feel smooth as you rub from top to bottom. This is the way most people will smooth down their clothes.
However, it’s totally up to you which way you place the nap. You can even use the nap as a design feature to color-block a garment whilst only using one fabric!
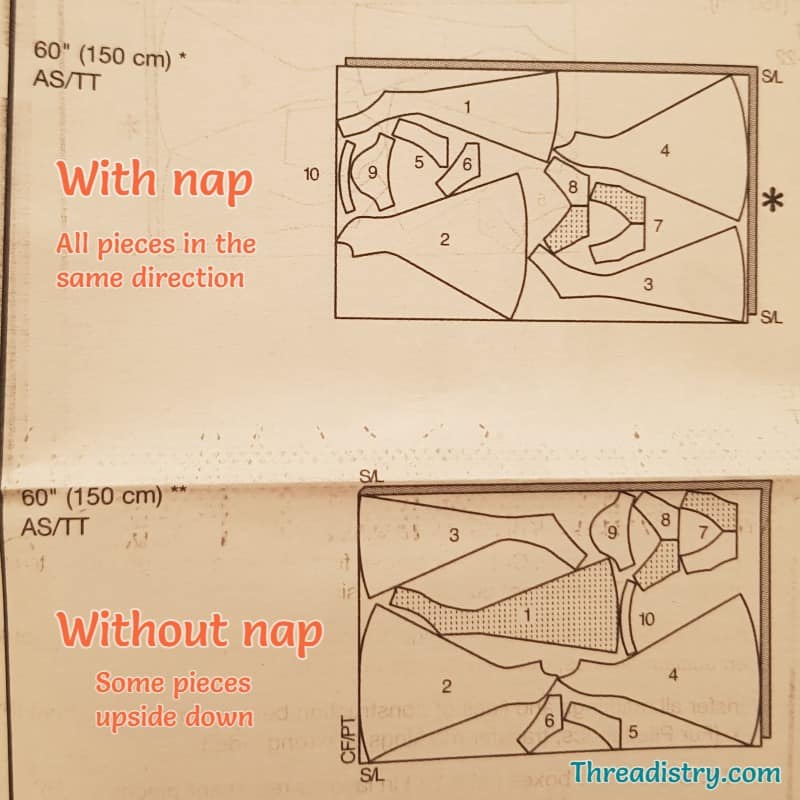
Some sewing patterns include separate layout drawings for fabric with and without nap. This should also be used for directional fabric.
How to sew fabric with nap
Positioning fabric pieces together can be tricky for fabric with nap. It can slide easily in one direction and grip like Velcro in the other, making it difficult to get seams to line up.
I find it easier to lay one piece of fabric on a table and carefully place the second piece on top. I also like to use LOTS of pins to make sure the fabric doesn’t slide around before I sew it.
Generally, when you are sewing right sides together, the nap won’t affect how you sew the fabric. However, if you need to sew wrong sides together or right side to wrong side, the fabric may feed more easily in your sewing machine if you sew with the nap.
How to press fabrics with nap
Care should be taken to avoid crushing or flattening the nap of the fabric. Here are some tips for how to press fabric with nap:
- Press the fabric as little as possible and use gentle pressure.
- Use an up and down motion, rather than sliding the iron across the fabric.
- Press from the wrong side of the fabric.
- Place a towel or pressing mat underneath the fabric.
- Use a Clover Roll & Press to only press the seam and avoid pressing the rest of the fabric.
- Alternatively, lightly steam the fabric and then finger press your seams rather than using an iron.
More sewing tips and tricks:
- How to remove fold marks from fabric
- Everything you needed to know about fabric marking tools
- Keep track of your fabric stash with printable fabric stash labels